Translate

Monday 15 December 2014

Hot Textiles - Health and Safety


- Work in a well ventilated room.

- Hold heat gun 25mm away from materials.

- When using a heat gun to distress materials make sure you work on a tile of a piece of glass.

- Keep hands away from materials when using the heat gun.

- Use a metal tool to hold the materials when working with the heat gun.

- Take care when using hot irons.

- When using a iron to distress materials make sure the material is placed between two sheets of parchment paper.

- Let materials cool before handling.


Tuesday 2 December 2014

Wrapping and Coiling 3D textiles

Coiling is a basketry process and has been used by most cultures for centuries.
Coiling strengthens the fabric so it can be twisted and manipulated to produce 3D forms.

How to begin:

- Cut a length of fabric roughly 30cm long.

- Choose a thread that is not too fine.

- Lay the fabric down, then place the thread about 30mm on top of the fabric.

- While holding the fabric and thread fold it over and then start to wrap.

- Once you have wrapped as much of the fabric as you want

- To finish off tie the end of the wrapping thread to secure.

Steamer - Health and Safety

- Clear work area where steamer is situated.

- Fill bottom reservoir with water between 'min' and 'max' levels.

- Replace containers with lid.

- Turn on at the mains and set timer for desired length (about 20 minutes is usually sufficient for fabric.)

- When sample had steamed for desired time lift lid, keep hands and face away from open container.

- Remove fabric with tongs or other suitable implement - NOT fingers.

- Be aware items that have been wrapped maybe very hot, leave sample to cool down before removing wrapped objects.

Monday 17 November 2014

Abstract Conversation Paintings

to create these pieces we started of looking into the work of Jackson Pollock, Franz Kline, Cy Twombly, Clifford Still and Fiona Rae. 

They each show different ways to create abstract paintings, once we had got inspiration from these artist we were ready to create our own pieces.

To start we had to chose between either white or black paper and then get some red, yellow, blue and white acrylic paint.
For my first piece i had decided on white paper.

We were told that each mark should contradict/contrast with the previous one(s).
That the marks could overlap, attach or even insert into previous marks.
making sure to vary the stronger and lighter marks to the softer and sharper.


Here is that finished piece.


Mould Making


Mould making - 

we were told that we were going to be making a mould for a bowl/vase, so the first thing we did was to do some initial sketches of shapes we would want to create. 
I had chosen a shape that was small at the base and got larger towards the top. 

After I had decided what shape I wanted my mould to be we were told that we had to build the shape up upside down in a block of clay 

Below is an image of my finished block to create this we had to make sure that there wasn't any under  cuts otherwise when we've poured in the plaster and let it dry the mould won't be able to be used because them the finished piece would come out without breaking. To create the smooth edges we used a kidney bean  


The next step was to grab some lino making sure that the piece is taller than you clay mould, using both the clay and masking tap make sure that there are not any gaps where the plaster could leak out.


Now its time to make the plaster, to do this you have to start by getting a plastic container and filling it up a quarter of the way up with warm water then with a spoon slowly add the plaster powder into the water mix it with you fingers, and keep adding more plaster until it is thick. (When mixing make sure to always keep it moving don't leave your fingers in there for a long period of time)

Now you take the mix d plater over to your prepared mould and slowly pour it, you only have to pour the mixture up to the point where it had covered the whole of your clay mould.


Leave it to harder for about 15 minutes, and to test if its dry run one of your fingers nails across the top of the mould if nothing comes off with your nail then it is set and ready to be un wrapped.


Here ^ is a picture of my mould after I had unwrapped it the next thing we did was to release it from the board on the bottom sometimes this comes off easy, but in my case my lecturer had to use a chisel and hammer lightly to release it. 

Then you flip the mould over and get all of the clay out from inside, this had been quite challenging for me as I had such as small and slender shape.

Then we left them on the shelves until next week.


The next step is to make a slip cast, to do this you get your mould and watered down clay pour the clay all the way to the top of the mould let that dry over night then with a pointed tool gently pry out the cast

This is what i got left with, due to it being so thin mine ended up breaking off a little, but because i now have the mould i can make several more of these.

The artist we looked at for this workshop was Picasso.

The Pen Tool

Adobe Illustrator

At first the pen tool can seem quite hard to master, but after you have learnt the basics and practice, over time you realise that after all it is a piece of cake.

The first thing to do is draw a straight line.

To do that click and release the mouse where you would like the line to end and then click again  
The next thing to master is a curved line

To start you follow the same procedure as the straight line, but when you make you're second click rather than dealing it you hold on to it and then move it in which either direction to get the desired curve.

now you have the power to create all sorts of shapes and imagery.

Sunday 16 November 2014

Frottage

The next workshop we looked into was frottage we started by looking into the work of Max Ernst and Wassily Kandinsky.

Ernst creates his piece by taking some frottage and then cuts it all up and then sticks it back together in different places.


On White II - 1923
Oil on canvas


Materials needed: 
 - thin pieces of cardboard
- lots of thin textured materials
- Glue
- Scissors

I started by cutting out two different sized triangles out of textured wallpaper, I then placed them to the side next I decided to cut out a small circle from mesh I then cut a square around the negative space that the circle left, I thought that it could make a nice positive/negative combination. 
Now I felt ready to start making my board the first thing i did was to just position the materials and shapes before gluing them down. i then got some masking tape and placed a strip of it down the bottom left hand side, this is what helped me to figure our what went where.

Once finished it was time to start taking the rubbings, I placed my board does on the table and laid a piece of paper over the top of it then i grabbed a graphite stick, making sure to use it one it side. Holding the piece of paper started to rub the print through onto the piece of paper. 

I then copied this several other times, later one I tried making a print from using printing inks by just rolling the ink over the paper to get a darker print than the graphite would give you.


Pinch Pots

Week 1: Open Forms 

using a pinch technique we were told to make at least 4 pots 

those four are:

-really open 
-tall
-bowl
-difference

2 pots had to be made from white clay and the other 2 in red.

I started with the white clay. 

First I rolled it into a ball and I pushed my thumb into the middle of it, then I start to push my thumb towards the side while holding it in my other hand the first pot I decided to make was the bowl I knew that i needed to have all of the sides even. I didn't wanting it being to thin but quite a small bowl.
In the image below my bowl is the one with the wavy rim, I had started off by making it flat but later changed it to wavy.

The next pot I decided to make the really open pot like with the bowl pot I started with a ball of clay but this time it was a little bigger, I put my thumb into the ball and rather that the bowl I had decided that the sides had to be a lot thinner this time so that I could make it so wide.

Before I moved onto the red clay I had to make sure to wash my hands because otherwise the clay would mix in with the other clay. (which doesn't look very nice.)

Like with the previous two pots you start out with the ball of clay in your hands and putting your thumb into the middle of it. I found that working with red clay was a lot more difficult than the white as it is a lot stiffer. 

To create both of the red pots I had to push the clay down rather than out, so then it would become taller. 
The taller bowl with the small opening was quite challenging because I had to try and make it smaller without leaving clumps of clay to make the neck smaller I did a little cut and took out a section of it and then with the left over sides I pushed them together and then smoothed it so it didn't look out of place. I had repeated this three times around the top of the pot.          


Week 2: Closed Forms

Aim to create 3 closed forms that use:

- Additions
- textured surface
- piercing

To create close forms you have to start with two of the same size bits of clay roll them into spheres and like with the open forms you have to push the clay outward to make it into a semi circle.

Once you have done that to both of the spheres you have to slash all the way round the rim of the semi circles and then apply some slip.

Take one in each hand and then gently twist in opposite directions until they form one whole circle, once you feel you have twisted enough, lightly with a wet finger go around the join of the two semi circles and smooth it up and down all the way around so there is no more join left and it becomes one form. 

Repeat this several times, bearing in mind that if you want to create a more oblong shape, then when you are pushing the clay outward make sure to keep pushing it till it makes the desired shape.

Here is a picture below of my finished closed form, my favourite thing to do to these forms was to pierce them that is why in all three of them that is what I have done.


Week 3 : Joining closed forms

As we had looked at creating open and closed forms separately, it was now time to make a final piece that consisted of joining 3 closed forms together.

Taking inspiration from the tester pieces I made i created this piece, I feel that together each part of my final piece represent one of my tester pieces. 

My main inspiration was from Pamela Sunday.

Due to the use of piercing. 


Saturday 15 November 2014

Pamela Sunday


Pamela Sunday makes ceramic sculptures inspired by nature and science.

Her interests in natural forms dates to childhood, when she played alone in the woods, combing the ground for fossils and hiding in hollowed out trees.
Before discovering her love of clay in the early 90s, Sunday worked as a art director for Bergdorf Goodman.


http://pamelasunday.com/

http://www.pinterest.com/search/pins/?q=pamela%20sunday%20sculptures

Thursday 9 October 2014

Hand Stitch


7 Simple Embroidery Stitches

We have been introduced to seven of the most simple stitches that can be used when creating textile pieces but also can be used as an extra for all of the other pieces that we have been creating for example the collagraph.


1. Running Stitch


Pass the needle in and out of the fabric, making the surface stitches are of equal length. The stitches on the underside should also be of an equal length, but half the size or less than the upper stitches.


 2. Seeding

 The filling stitch is made up of small straight stitches of equal or different length placed at random over the surface.                                            
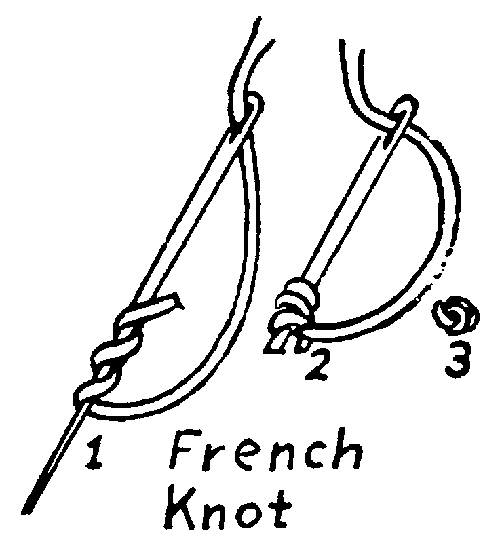


   3. French Knots

Bring the thread through the back of the fabric, hold the thread down where it emerges with the left thumb and encircle the thread twice or three times with the needle (Step 1). While still holding the thread firmly with your thumb. twist the needle back to the starting point and insert it close to where the thread first emerged. (Step 2)
(Not in the exact same hole or it will simply pull back through)
Pull the needle through to the back, leaving a small knot on the surface. (Step 3)  


4. Chain Stitch

Bring the thread up at the top of the line and hold it down with your left thumb. Insert the needle where it last emerged and bring the point out a short distance away. Pull the thread through, keeping the working thread under the needle point.


   5. Detached chain stitch

Bring the thread through at A and, holding the thread down with the thumb, as shown, insert the needle agin just a single thread away. Still holding the thread, bring the needle through at B. Pull the thread through gently to form a small loop, then insert the needle at C to form a small tying stitch over the loop.
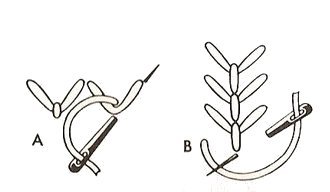


6. Fly Stitch

Bring the thread through at the top left. Hold it down with the left thumb and insert the needle to the right on the same level, a little distance from where the tread first emerged. Take a small stitch downwards to the centre with the thread below the needle.
Pull through and insert the needle below the thread, as shown, to hold it in place. Bring the needle up again in position to work the next stitch.


7. Couching

Lay down the thread to be couched and with another thread catch it down with the small stitches worked over the top.


Tuesday 23 September 2014

Handmade Felt Workshop

Felt Making

Felt is the oldest textile known to man. It predates weaving and knitting, in Turkey the remains of felt have been found, dating back to at least 6,500 BC. Felt is produced in many places in the world for such a diverse numbers of items such as: shoes, carpets art objects, tents, hats and jewellery.

Materials needed:
- Merino Wool Tops
- Warm water
-  Bar of soap
- Bubble wrap
- Netting
- Bamboo mat
- Towel or sugar paper

How To Make Felt

> Place the towel or sugar paper on a flat surface. Lay bubble wrap, bubble side up on the surface. Using Wool tops, pull the end fibres out gently and lay them down on the plastic in a square with all the fibres in the same direction.

> Leave a gap of approximately 2 cm clear between the edge of the fibres and the end the edge of the plastic. When you have created a fine but dense layer of fibres repeat the process but with the fibres laying in the opposite direction, making sure that you can't see the previous layer through the second layer.

> Repeat this process with the fibres running in the direction of the first layer and so on for about 3-4 layers.

>Boil the kettle and then get a small dish put a small amount of water from the kettle and then add a lot more cold water, so then the water is only warm.

> Place the netting over the top, sprinkle a small amount of warm water on top of the netting. Sweep the soap bar across the netting.

> With wet soapy hands rub over the netting, making sure that your hands are flat. If necessary, add some more water to ensure that the wool is "wetted" but not to much so that the piece is saturated.      

> Carry on rubbing until the fibres have bonded together, turn your piece over and repeat. Then you can roll it in the bamboo mat which increases the bonding process.

> Rinse out the piece in cold water, rinse out felt piece and roll it again in the bamboo mat. 


Health and Safety:

- Make sure that when boiling the water in the kettle, that you add enough cold water to it so you don't end up burning your hand when sprinkling it over the mesh.

- If there any spillages make sure to clean them up straight away.


The artist related to this workshop is Moy Mackay   
My Finished Piece

Week 2 - Response to artist
Here I have step by step images showing how I have created my piece
I had decided that I wanted to create a piece that showed a field with one sheep this relates to the pieces the artist has created with sheep involved.


I started by creating my background layer, made from white felt i then added my colour mixed of blue and white to create my sky.


I then decided on doing another colour mix where I took a light green and a dark this I used to represent grass I then took some orange felt and cut out a circle for the sun, i wanted it to stand out to create a more abstract approach.


I decided that I wanted create a fence, to do this I took a small amount of felt and started to twist it, this takes a while to do as this felt tries to unravel but eventually it stayed twisted. I repeated this several more times until completed.  


The next thing I created was the tree to do that i took a small amount of brown felt and made the truck, then like with my fence I took small amounts of felt and twisted it the difference with these twists where that I only twisted them at the top and the bottom.
Between the sky and the grass i had decided to add some small wavy parts of the teal felt, i felt that it would look more like Moy Mackay.
To create the sheep i started by getting some white felt which I rolled into a ball I then placed it on. For the face i got a small piece of black felt and like with the white i rolled it into a ball, to make the ears i pulled at the ball.

 The next steps are the same as the plain piece of felt i started by getting the mesh and placing it over the piece then i added the water over the top making sure to get all of the edges wet, then you take the bar of soap and rub it all over the mesh. With your hands rub over the netting making sure to keep  your hands flat. Flip the piece over and repeat the process.
  
This is what my piece looked like after I had flipped it over and rubbed it with the soap.
The next step was to put it into the bamboo mat. I had struggled with this this time as my piece was quite big and did not fit completely in the mat, but i just kept rolling it between my hands and then flipping it until it shrunk and was small enough to completely fit in the mat. 


After i had rolled it in the mat a few time i took it over to the sink and rinsed it our with cold water, this is how it turned out. I am happy with my final piece and feel that I have created something that looks similar to the artist's pieces.

'The Cheviot Line'

Here is an example of one of Moy Mackay's piece that includes sheep.

Stages Of Clay

1. Slurry - watered down clay in a muddy form, used to join other pieces of clay to each other.

2. Plastic - soft - Workable stage; moulding stage, can be recycled.

3. Leather hard - stiff, will hold its shape, join to other pieces, carve into and recycle.

4. Greenware - Bone dry, can be carved into but is very fragile

5. Bisqueware - fired once in the kiln can not be recycled - glazing stage.

Working With Clay - Health and Safety

One of the biggest health and safety concerns when working with clay, glaze, slips and plaster is dust.    
Powder residue can cause respiratory problems if used in poor conditions and without safety precautions.

Silica dust exposure and risk

Clay contains respirable crystalline silica, most of which is chemically combined with other materials. The crystalline silica that is not chemically combined is often referred to as 'free silica'.

Fine dust particles containing free silica are a major concern because they can:

> be invisible to the naked eye under normal lighting conditions.
> be airborne for long periods of time in your breathing zone.
> Breathing in silica dust may lead to a lung disease known as silicosis, this is a serious lung disease causing permanent disability and early death.
> 'Respirable' means that the dust can get to the deepest parts of the lung.

General Health and Safety - Clay Dust 

1. Use a damp sponge/cloth when cleaning surfaces, never dry brush.
2. Spillages of dry materials should be vacuumed up and not washed or wiped.

Monday 22 September 2014

Pallant House


On the 16th of September 2014 we took a trip down to Pallant house, Chichester


There were several exhibitions including: De'Longhi Print room, Barbara Rae prints
The Scottish colourist : JD Fergusson and royal academician printmakers.

Barbara Rae


JD Fergusson

Throughout the whole of the gallery there was a wide variety of pieces from abstract to 3D and traditional.

There was several pieces that I had liked below is one of my favourite from that visit.


Paul Nash 1889 - 1949
Winter Wood 
1922
Wood engraving on paper

This piece was one of my favourite pieces in the exhibition although it's small i like the detail of the lines as the main colour is black it really shows the true message behind the piece.
Nash's experience of the war left him town between Vorticism and its embrace of the modern machine age, and the romantic tradition of the english landscape. there is a sinister feel to this engraving, depicting a solitary female entering the dark forest.
Nash's mother suffered from depression and died when he was a young man. He was intensely aware of his mortality and often spent time in the wood near his parents home.

Their Website: http://www.pallant.org.uk

9 North Pallant, Chichester, West Sussex, PO19 1TJ  

Barbara Rae


Barbara Rae RA has made printmaking an integral part of her artistic activity since her student days. Monoprints, screenprints and etchings inform her approach to painting which combines the influence of landscape and travel with painterly abstraction.

Barbara Rae 'Harbour Night'
2005
Coloured etching and collagraph on zerkall paper.
Printed by Peacock Visual Arts, Aberdeen

'Harbour Night' is one of Rae's favourite prints.
In the words of the art critic Andrew Lambirth: "Yellow lines of energy or light cross the lower middle section like straws in the wind, while the pinks and purples block out the main volumes, overlaid by a fretwork of darker lines. It is a deeply satisfying image, uniting the skills of the technician at Peacock Visual Arts, Mike Waight, with the artists vision, in a compelling study of light and dark, line and volume, rhythm and clarity of statement."

Her pieces are so complex because to get the kind of result she wants there has to be quite a number of layers, this piece shows two boats in the harbour at night. one of my favourite quotes from Rae is "Im not a landscape painter. What interests me is anything altered by mankind's hand, historical components, things that make the spirit if a place." With her use of colours it proves that she tries to create piece of art that stray from the original image. I like this piece because it doesn't consist of very many colours but as they are all contrasting against each other  they all stand out from one another.
The part of this print that stands out the most to me is the white strip on the larger boat. i like that all of the colours that are used i this piece are not even close to the natural colour of the original landscape.


http://www.barbararae.com

Saturday 20 September 2014

Collagraph


Print Workshop

Inspired by Barbara Rae we were told that we were going to be making three collagraph plates

A collagraph is a collage printmaking technique where the image is created from a variety of textured materials glued to a cardboard base. This forms a relief block with different surface areas and textures.  

To create this you need these materials:

- Watercolour paper
- Blotting paper 
- Caligo safewash relief inks
- Tissue paper and newsprint
- Scrim
- Toothbrush  
- Thick cardboard plates
- lots of textured materials like : mesh, masking tape, tin foil, carborundum powder, thread, textured wallpaper etc.
- PVA glue
- Albion printing press and roller press

With this workshop we were told to create abstract pieces rather that creating a plate from a photograph.

Although these plates are abstract we had to take into the account the principles of design these are:
- Pattern
- Contrast
- Emphasis
- Balance
- Proportion/Scale
- Harmony
- Rhythm/Movement

Stage 1
The steps to create these plates are:
1. Look through the textured materials and decide which ones you are going to use for the first plate.
2. Design your plate making sure that when sticking then down with PVA glue all of them are secure, as you don't want them falling off when printing.
3. Once all of the PVA glue is completely dry, each plate has to have two to three coats of shellac. (Shellac is used as a protective coat so then the plates can be used over and over again.)
4. Once the shellac has dried you can start to print.


Stage 2

5. The first thing to do is get the next lot of equipment : ink, board, scrim and watercolour paper.
(Before you start to print you need to put some pieces of watercolour paper into water so it will be ready for when you want to print.)
6. take a small pea sized amount of ink and place it onto a board, to mix two inks you get a small piece of cardboard and add the colours together. To ink up your plates you take a small amounts of ink with scrim or a toothbrush. Work the ink into the plate in a circular motion. Once you feel that there is enough ink on the plate take the tissue paper and lightly buff it over the plate. 
7. Lay your collagraph on the printing bed face up. take a bit of the watercolour paper out of  soak and try to get the excess water off by placing it between the blotting paper, then lay it over the top of the plate and cover with the felt blankets.
8. Roll the collagraph through the press, carefully lift up the blankets and remove the finished print.

Health and Safety for this workshop is :

- Take care when using the printing press
- Keep work area clean and tidy 
- Wear gloves and an apron (if required)
- Keep the room ventilated